
OVERVIEW
Today i will review a program that make easy for you to capture photo using sreen Capture Software
SnapIt is easy to use screen capture software which allows you to easily capture
anything on the screen including windows, menus, full screen, rectangular regions,
web pages and take shots of moving images.
Capture anything you see on your PC screen!
Don't waste time cropping your captures. Take a "snapshot" of anything exactly what you need, with just a click.
Easy to Learn, Easy to Use!
Using SnapIt Screen Capture Software takes just three simple steps:
1. Start the program (click on the program's icon). It appears minimized in a system tray: 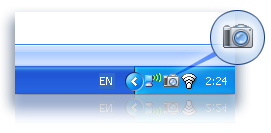
2. Click PrtScr (Print Screen) button and select with mouse what you need to capture on the screen. After selecting the region it is automatically copied to the clipboard.
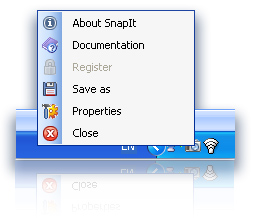
3. Save a snapshot from the clipboard with any way you like:
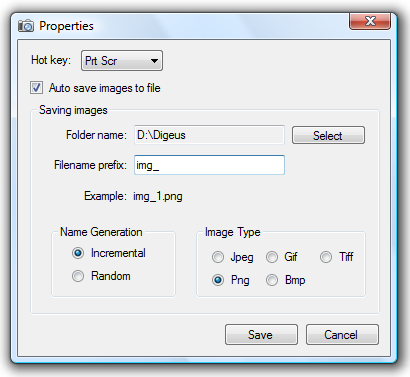
4. Use the Properties menu to define the hot key you want to press to take your screenshots
The most powerful feature of SnapIt:
In menu Properties you may switch on "Auto save images" option. It means that every time you capture image on your PC screen you don't need to save it! It will be saved automatically in the selected folder with selected image type. It is a very convenient feature for web designers who surf the Internet for new graphic ideas and want to save them in their local collection with one click.
Top features:
Discover how easy it is to take a "snapshot" of anything exactly what you need on your PC screen!
Features
Requirements
Minimal system requirements:
installed and configured on your system.
Snapshots
System tray bar
Main menu
"Properties" window
Capturing a region
Captured region inserted into manual

FootNote ~ You also got a giveaway if you review the program
and publish an article about it .Just inform to me. Thank You


1 EDITOR COMPLAINING:
thanks for this tips
Post a Comment
DON'T LET THE NOISE OF OTHER OPINIONS DROWN OUT YOUR OWN INNER VOICE AND MOST IMPORTANTLY, HAVE THE COURAGE TO FOLLOW YOUR HEART AND INTUITION ™